How to Change Electric Scooter Mechanical Disc Brakes
Want to support our hard work? Subscribe to our channel!
Learn how to do a mechanical disc brake adjustment, including tools and tips for how to fix loose brakes (while keeping the brake light on).
As mechanical brakes wear in, the cable gets slack, taking more physical effort for you to get the brake pads to grip the rotor.
Here's a diagram of a disc brake with the tools and how-to for fixing mechanical disc brakes.
As mechanical brakes wear in, the cable gets slack, taking more physical effort for you to get the brake pads to grip the rotor.
Here's a diagram of a disc brake with the tools and how-to for fixing mechanical disc brakes.
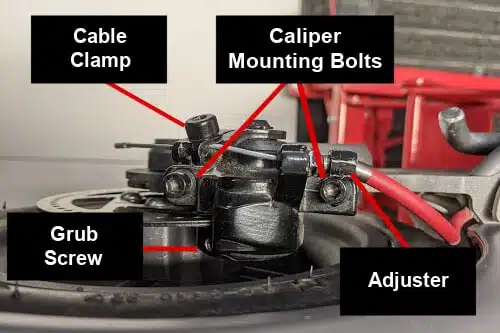
Mechanical disc brake diagram | Credit: Trina M. / RG
Tools
- 8 mm open-ended wrench
- 2 mm Allen wrench
- 4 mm Allen wrench
- 5 mm Allen wrench
Check the brake cable for slack and tighten the cable via the adjuster

If you pull on the brake lever and there’s too much slack, start with a cable adjustment.
Mechanical disc brake cables have an adjuster, which is usually a plastic knob or locknut.
For minor mechanical brake adjustments, you can add tension on the brake cable by tightening this adjuster. Use an 8 mm open-ended wrench and turn it counterclockwise by ⅙ of a turn.
Give your tire a turn to check if the brakes are dragging, meaning the brake pads are too snug to the tire and are preventing the wheel from spinning.
If the mechanical disc brakes are dragging, loosen the locknut by ⅙ of a turn until the tire spins freely.
Check the brake lever for responsive feel and to ensure that your brake light is working properly.
Important: After adjusting your mechanical brakes, ensure your taillight is working. Many electric scooter configurations use the brake light switch to activate regenerative brakes. When adjusting the brakes, it’s possible to tighten them so taut that it disables the taillight or causes it to trigger long after the disc brakes are locked. This means that the brake light will not illuminate as you’re braking and the motor will not receive a signal to engage regen braking.
Reposition the cable clamp to reduce slack and tighten the cable.

If the cable is still a bit slack, you should reposition the cable clamp. Using a 4 mm Allen wrench, loosen the bolt on the cable clamp.
While holding the cable taut in one hand, slide the arm of the clamp forward along the cable to reduce the slack. When the arm is in a better position, lock the bolt down.
Give the tire a spin to check for dragging, and pull on the brake lever to ensure brake light response.
While holding the cable taut in one hand, slide the arm of the clamp forward along the cable to reduce the slack. When the arm is in a better position, lock the bolt down.
Give the tire a spin to check for dragging, and pull on the brake lever to ensure brake light response.
If a cable adjustment doesn’t fix your mechanical brakes, make sure the mounting bolts are secure.

The mounting bolts can loosen while riding, and securing them is known as a simple caliper adjustment.
Use a 4 mm Allen wrench to loosen the mounting bolts on either end of the caliper. Rotate each mounting bolt 1 full turn counterclockwise to loosen.
Spin the wheel while pulling on the brake lever, and snug the mounting bolts back down. This should align the position of the brake caliper with the rotor.
Ensure that everything is working correctly by giving the wheel a spin to check for drag, and pulling on the lever to check the brake light. If you’re getting some drag, you may need to loosen the mounting bolts a touch (try ⅙ of a turn at a time).
Release the housing from the rotor by loosening the grub screw

In a full caliper adjustment, you are releasing the housing from the rotor and moving the brake pads as far away as possible, so you have more room to reposition them correctly.
To adjust the inner brake pad, you’ll need to unlock the caliper from the rotor. A grub screw locks it down against an adjuster, located on the backside of the housing.
Using a 2 mm Allen wrench, rotate the grub screw one full turn counterclockwise to release the caliper from the rotor.
Next, release the brake cable by loosening the mounting bolt on the cable clamp with a 4 mm Allen wrench. This provides enough room for you to work with the outer brake pad.
Loosen the adjuster on the backside of the disc brake, so you can align the calipers more precisely.

Using a 5 mm Allen wrench, rotate the adjuster counterclockwise by 1 full turn.
If the wheel does not have a motor, you can reach the wrench through the rim to the back side of the brake caliper to loosen the adjuster.
If the wheel does have a motor, you’ll have to loosen the grub screw until you relieve enough tension to move the housing along the rotor.
On the frontside, use a 4 mm Allen wrench to rotate the mounting bolts counterclockwise until they are loose, not all the way, but enough for you to slide the caliper side to side.
Align the housing and rotor to set the position of the inner brake pad.
Now that the calipers are pulled away, align the brake housing with the rotor. Use the seam line down the center of it as a guide to line it up with the center of the rotor.
Once they are aligned, tighten the mounting bolts. On the back side, tighten the adjuster by 1 to 2 full turns clockwise (5 mm Allen wrench).
Spin the wheel; if you’ve tightened the mechanical disc brake enough, there will be some drag.
Relieve some of the tension via the adjuster on the back side of the brake by ¼ turn at a time, checking the contact between the brake pads and the tire.
You want the inner brake pad to almost touch, or barely touch the tire once per turn. When it feels like it’s in the right spot, lock the inner brake caliper in place by tightening the grub screw (2 mm Allen wrench).
Set the position of the outer brake pad using the cable clamp

To adjust the outer brake pad on a mechanical disc brake, loosen the screw on the arm so you can reposition the cable clamp.
Turn the bolt on the cable clamp counterclockwise and slide the arm up as far as you can, then back down a little bit, and lock the bolt in place (4 mm Allen wrench).
Next, check for drag. If there’s any slack, turn the cable adjuster ⅙ turn clockwise until you feel some brake drag as you’re spinning, then back it off until the wheel spins freely.
Check the response, and make sure the taillight illuminates when you pull on the brake lever.

If you have an electric scooter with a mechanical disc brake, regenerative brake, and brake light configuration, it’s very important that the light is working correctly, so others on the road know when you’re braking and to trigger regenerative braking.
For more guidance on how to care for your electric scooter, check out our technical guides.
For more guidance on how to care for your electric scooter, check out our technical guides.
Related Reviews
MYON
EMOVE Cruiser V2 AWD | Dual Motor Long Range Commuter Scooter

Circooter Cruiser Pro | Performance Scooter for Less
Teewing Mars XT 8000W | Performance Electric Scooter

Our newsletter has the biggest discounts, newest scooter reviews, best how-to’s, & no spam. Unsubscribe anytime!