Guide to EY3 Throttles
This guide to the EY3 throttle is the most complete manual and covers everything from technical details to settings to troubleshooting and error codes.
What Is the EY3 (EYE) Throttle?
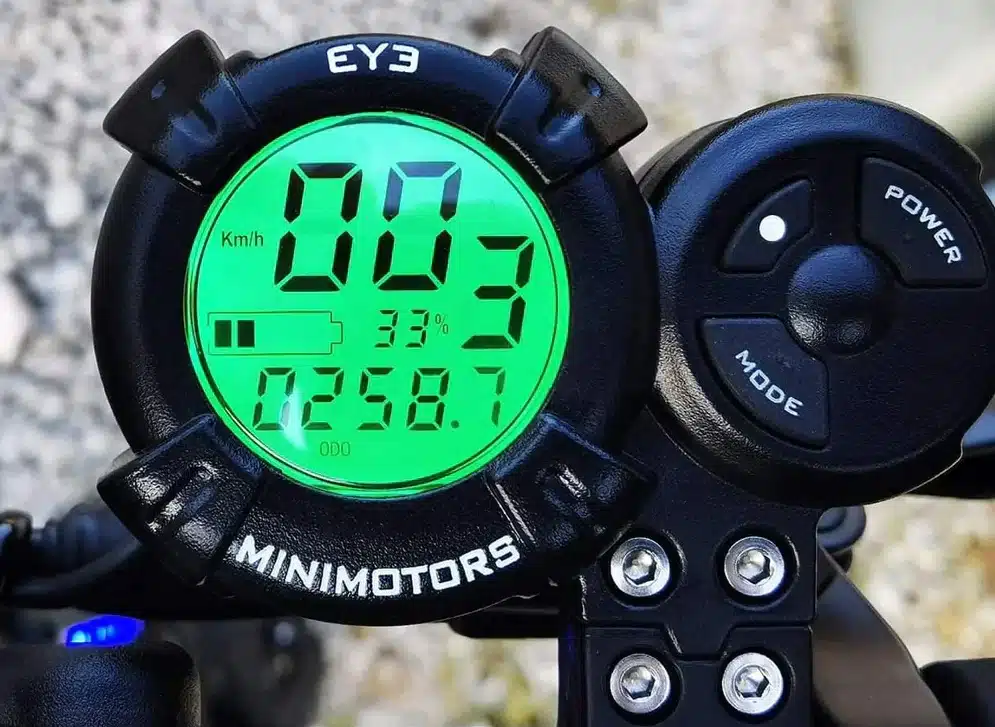
The EY3 (EYE) is a trigger-style throttle and LCD display that is ubiquitous in the parts bins of electric scooter manufacturers around the world. Minimotors, Kaabo and Currus brands all use an EY3 throttle.
This LCD throttle interfaces with the controller and battery and should not to be confused with being a controller itself — a beefier component buried deeper with the electric scooter. The EY3 throttle provides a readout of speed, odometer, trip, mode, and battery remaining. It features buttons that allow you to power your scooter on and adjust a cryptic list of electric scooter settings known as P-settings or program settings. These settings dictate everything from regenerative braking strength to max throttle power to motor pole configuration. If you’re looking for specific settings for your electric scooter, see our database of electric scooter p-settings.
Features
The EY3 throttle features a large, back-lit (typically green) acrylic-covered LCD, three buttons (gear selector, mode and power), and a trigger-style throttle. The trigger throttle works well, but we and others have noted that it’s not the most comfortable for longer trips due to the very stretched out position it puts your finger in.
The typical EY3 display is not waterproof and we’d even venture to say that it’s barely water resistant as no special measures have been taken to seal the ABS case up from the elements.
The EY3 throttle uses a 5- or 6-pin connector that communicates with the controller via the UART protocol over TX and RX lines.
EY3 Manual
Power Button Usage
The display (and scooter) can be powered on or off by pressing and holding down the power button.
Odometer and Trip
Once the unit is powered on, you can toggle through the odometer, trip, and voltage settings by quick-pressing the mode button.
Adjusting Gears
The EY3 throttle offers a “gear” button (button with circle). This allows you to restrict the top speed of the scooter by the riding mode (1, 2 or 3). This is not the only setting that will affect scooter performance. If you are trying to get the most performance out of your scooter, you’ll have to max out P-settings, which are buried deeper.
How to Access Settings on the EY3 Throttle
- Power on your scooter.
- Long press the Mode button (3-5 seconds) to access the P-setting menu.
- Use the Mode button to toggle through P-settings.
- Use the Gear button to adjust values.
- To save settings, allow the LCD display to timeout (3-5 seconds) or long press Mode to exit the menu.
EY3 Settings Explained
The EY3 LCD throttle is designed in such a way to be compatible with a wide range of electric scooters (and even e-bikes) that operate on different voltages, with different motors and tire sizes (among other things). With the EY3, some P-settings are lettered.
For specific settings for your electric scooter (including factory default), lookup your scooter settings in our database.
P0 — Wheel diameter. P0 is used for computing speed and odometer by measuring the motor rotations per minute (RPM). If your speed isn’t being reported correctly, P0 is likely the culprit.
P1 — Battery voltage protection. Controls the critical battery voltage protection (do not adjust).
P2 — Motor poles. Motor pole settings are specific to scooter models and necessary so that the controller drives the motor phases at the correct frequencies for best performance.
P3 — Speed signal direction. Do not adjust this default setting (Default: 0).
P4 — Display units. Displaying the speedometer and odometer in metric or imperial. (0: kph, 1: mph)
P5 — Start style. Enables or disables zero-start feature which allows the scooter to be launched from 0 mph. When disabled, the scooter must be rolling a low speed before the motor will activate.
P6 — Cruise control. Enables and disables cruise control.
P7 — Acceleration speed. Used to increase or decrease acceleration speed.
P8 — Motor power. Sets the maximum motor power. For those trying to get the most performance out of their scooter, they’ll want to max out motor power.
P9 — Motor torque. Sets the amount of torque (1=50%, 2=75%, 3=100% (max)).
PA — Regenerative brake strength. Controls the strength of the braking applied by the motors. Setting it at 3 is makes responsiveness very strong (0=None, 3=Strong).
PB — Display brightness. Controls the brightness of the screen.
PC — Scooter auto-turn off time. Control the amount of time (1-30 min) the scooter should be idle before auto-shut off is enabled.
PD — ABS (antilock braking) setting. Sets antilock braking (0=ABS off, 1=on).
EY3 Error Codes and What to Do About Them
When the EY3 display controller detects an error, you’ll get the triangle + exclamation symbol and it will display the fault code just above the battery life display. The table below lists all error codes and their meaning.
| EY3 Error Code | Meaning |
| 2 | System error |
| 4 | Motor error |
| 5 | Accelerator error |
| 6 | Controller error |
| 7, 8, 9 | None |
Troubleshoot error codes
Cruise control 1: When cruise control is engaged, this code displays on the screen.
Brakes activated 3: When the brake levers are pulled, this code displays on the screen.
Motor / hall sensor error codes 2, 4: These error codes will be triggered when there is a problem with either the hall sensor (which senses motor speed) or power connection to the motor itself.
Controller error codes 5, 6: These are all related to the controller and communication. If you’re getting this immediately after powering your scooter on you might have to wait a bit for communication to be established and it should go away. If it persists, then make sure the EY3 throttle is properly connected to the controller. If you have a plug and play style connector, check it and try disconnecting/reconnecting.
Check out our current Editors picks of the best electric scooters on the market!
Related Reviews